2012/07/20

How to Backup Registry in Windows 7/Vista/XP


The most important Windows system information is usually stored in the registry. It is also one of the main factors affecting system stability. A lot of software failures are related to the registry; therefore registry backup has become a solution to many problems. Here we’ll explain a step-by-step guide on how to back up the Windows registry in Windows 9x/Me/XP/Vista/7.

Backup Registry by Hand
We must develop a good habit to back up the registry before installing software (in particular, experimental software). It’s best to back up registry before every installation, and save as reg files with different names. Once you find the software not good, do remember to double-click the registry backup file after you uninstall the software. Although the manual backup of the registry is annoying, it is really convenient. When you cannot enter the Windows graphical interface, the manual recovery shows its power.
Backup Registry in Windows 9x/Me
The bottom layer of Windows 9x/Me system registry consists of System.dat and User.dat, which are generally stored in the Windows directory. If “Users can customize their preferences and desktop settings” is selected in “Password” in the control panel, the system will create for each user their own User.dat file and store it in “C: \ Windows \ Profiles \ user name “directory. Back up the files under this directory to finish the registry backup. Need to remind everyone: for security, System.dat and User.dat file attributes are of system, hidden, and read-only attribute. So you should remove the attributes before backing up the files.
Backup Registry in Windows 2000/XP
Windows 2000/XP system registry files are stored in “C: \ Winnt \ System32 \ Config” folder, and user profiles in “C: \ Documents and Settings \ user name” folder. Because of Windows protection mechanisms, we cannot directly copy them. So we need to boot into DOS system. If Windows 2000/XP use NTFS partition structure, a NTFS reading tool is needed.
Backup Registry in Windows Vista
The following will show you how to backup registry in Windows Vista.
Step1. Click Start and then choose Run.
Step2. Type regedit in the open box and then click Enter.
Step3. Windows will ask you for permission to run this command. Click Continue to open theRegistry Editor.
Step4. Choose Export in the above File menu.
Step5. Name the registry backup file and drop down to select the location where you want to save the exported registry file.
Step6. Click Save and allow a moment to complete the task as well as keep the registry backup file saved in the specified location.
Step7. Turn off Registry Editor and the registry backup is completed.
Backup Registry in Windows 7
Follow the step-by-step guide below to backup registry in Windows 7:
Step1. Click Start and then choose Run.
Step2. Type regedit in the open box and then click OK.
Step3. Locate and click the root subkey, where all the child subkeys and values that you want to back up will be stored.
Step4. Click Export on the File menu.
Step5. Select a specified location where you want to save the Registration Entries (.reg) file in the Save box, type a file name in the File name box, and finally click Save.
Till now, the registry backup in Windows 7 is done. And you can restore the exported registry subkeys at anytime. It is simple. Just double click the Registration Entries (.reg) file you saved.

2012/07/17

Computer Back Up Softwawre – How To Recover Data After Hard Drive Crash


Most computer users may have ever encountered hard drive crashes. Once it happens, they may destroy your important files or even everything on your computer including hardware connected with your PC. The biggest disaster is the data that you could never be able to retrieve. When hard drive crashes, what you look for will be good computer back up software. In this article, we will briefly explain how to recover data after hard drive crash.how to recover data after hard drive crash

Guide on How to recover data after hard drive crash

Preparation for data recovery step 1: purchase a new hard drive with large enough capacity
When your hard drive crashes, it usually means your hard drive, at least part of it, is damaged. Although computer users can do something to let the hard drive working again, to change a new hard drive is a better option. A new hard drive usually is more reliable and prevents from the risk of more data loss by the old hard drive which may crash again in the future.
Preparation for data recovery step 2: Install your new hard drive as your master hard drive and reset your original hard drive as a slave hard drive. By doing this, you are not only allowed to run your computer from the new hard drive, but also go back to run on the original hard drive. The most important thing you must remember is to find out the cause in your original hard drive, or your new hard drive may be compromised.
Get started on data recovery: Now it’s time to use your computer data backup software to recover the data off your slave hard drive (the original one). The data backup software must be able to recover data that has been removed during a hard drive crash or was stored in some sectors of damaged hard drive.

Tips on recovering data from a hard drive:

  • You can also install the hard drive into another computer when recovering files from a crashed hard drive. However it can sometimes mess with the setup of the computer. An external case is exactly that, external.
  • After you have recovered your data you can also use this hard drive as a spare storage device. When putting a hard drive into an external case the two must be compatible. If the hard drive has an IDE connection and is a 3.5″ then the external case must be compatible with that. If you have a Sata connection hard drive, you need a sata external case also.
  • If you are getting an “access denied” message when trying to copy a file you probably need to take ownership.
Finally, let’s frankly speaking, if you have the good habit to back up your files regularly,recovering files from a crashed hard drive may not be necessary.

2012/07/12

How to Make Picture Slideshow for iPhone 4


Is there any way that I can have a slideshow of my favorite photos on my iPhone 4? Try this great iPhone photo slideshow maker software namely BlazeVideo iPhone Video Converter to convert photos, pictures or image to iPhone H.264/MPEG-4 VIDEO (8.mp4) and make picture slideshow for playback on Apple iPhone, iPhone 3G, iPhone 3GS, iPhone 4, iPhone 4 HD.
Follow the simple step 1,2,3, 4 to make picture slideshow for iPhone 4  using BlazeVideo iPhone Video Converter now!

Make picture slideshow for iPhone 4 Step 1: Organize photos.

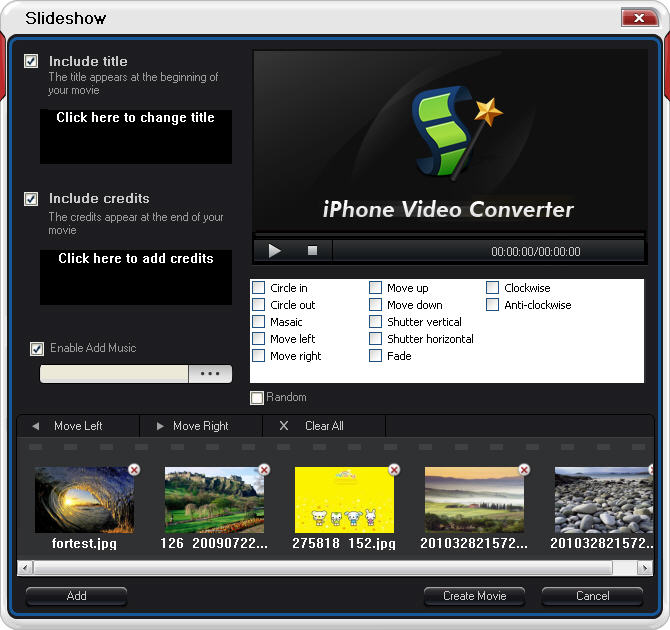
Click “Slideshow” button to turn to “Slideshow” window. Then click “Add” button to insert the photos you want to make slideshow.
create picture slideshow for iphone4

Make picture slideshow for iPhone 4 Step 2: Personalize your photo slideshow.

You can custom your own picture slideshow playable on iPhone 4 by: include title or credit, apply special display effects, add cool background music for better playback experience. After completing the picture slideshow settings, click “Create Movie” to go back to the main interface of BlazeVideo iPhone Video Converter.

Make picture slideshow for iPhone 4 Step 3: Convert your picture slideshow to MP4 for iPhone 4.

Choose “iPhone4” in “Profile” and select the output folder in “Output” tab. Finally, click “Start” button. Few minutes later, it’s done.

2012/07/06

How to Copy Main Movie from a DVD to iPad 2


As one of the most popular portable devices in current life, it does not mean that people can enjoy all videos on iPad 2. That is to say, you need to convert the videos through some converters at first. In this article, we will show you how to copy main movie from a DVD to iPad 2 compatible format, thus you can play DVD main movie on iPad 2 anywhere at anytime.

Step 1: Install a DVD to iPad converter software

Hundreds of thousands of downloads tell us the BlazeVideo DVD Copy is the best program to convert DVD to iPad.
convert main movie from a dvd to ipad 2

Step 2 Select iPad 2 as output device

After launching the DVD to iPad 2 converter software, insert the DVD disc to your computer drive. Your DVD information will be loaded automatically. Select “Movie File” in the drop down list of “Copy as” tab, and then choose iPad 2 as output device.
BlazeVideo DVD Copy software provides with several output MP4 resolutions for playback on iPad 2 even including the ones for iPad 2 HD. You are also allowed to customize the settings by clicking the “Setting” button: change the resolution, bitrate, frame rate in video and format, bitrate, sample rate, channel in audio. You can decide which works best with your iPad 2 device.

Step 3 Choose Main Movie as copy mode

This DVD to iPad 2 ripper tool has 4 DVD copy modes for your choice: Entire Disc, Main Movie, Customize, Split Disc. In this article, we mainly show how to convert the main movie from a DVD disc to iPad 2.

Step 4  Rip DVD to iPad 2 compatible format

By now it is time to convert the main movie of a DVD to iPad 2 supported format by clicking the “Start” button.

Step 5  Add the movie in iTunes and transfer it to iPad 2

iTunes is such a tool to help us transfer the converted DVD movie to iPad 2. If your iPad 2 is not connected already, please connect and transfer the movies from iTunes. Surely, if you want to move iPad 2 music and movies back to computer or iTunes, try iPad Transfer software.

Step 6 Play DVD on iPad 2 for enjoyment

Now, open your iPad 2 and play the DVD movie.

2012/07/02

Download and Convert YouTube Video to iPad / iPad 2 on Windows


YouTube, the most popular video-sharing site offers thousands of millions of interesting videos to all netizens. You can watch, download, upload and share these videos at your will. Want to download some fantastic videos to enjoy on your iPad / iPad 2 and looking for a workable method?  Well, in this article, we will show you how to download and convert YouTube video to iPad / iPad 2.
First, of course, you need a YouTube downloader. But remember, the video downloaded from YouTube is in FLV format, which cannot be used on iPad / iPad. That is to say, to watch YouTube on iPad / iPad 2, you need a converter to transcode YouTube video to iPad MP4 format. To complete your tasks, there is a perfect tool for you – iPad Video Converter. With this tool, you can fast download videos from YouTube and convert them to MP4 for iPad/iPad 2.

YouTube Video to iPad Guide

Now, let’s just download and install the converter and follow the guide below to achieve the goal. It only need 2 simple steps, you can finish downloading and converting YouTube videos.

Step 1. Download YouTube Video

Run the iPad Video Converter. Click youtube button button to open the download box. Enter the URL of the YouTube video you’d like to download and click “Download” to start downloading YouTube videos. All the downloaded videos will be showed on the source panel.

Step 2. Convert YouTube to iPad / iPad 2

Simply go to “Profile” and choose a device from the preset ones. To watch YouTube videos on iPad, you just need to choose “iPad” as the output video formats to get videos with optimized settings for iPad. Or choose “iPad 2” for watching on iPad 2.
choose ipad or ipad 2
Finally, click “Start” button to start converting YouTube. After it finishes, find the converted files in target folder and transfer them to iPad/iPad 2 through iTunes with ease.